A stable internet connection is essential for using your iPhone effectively. From browsing the web and streaming videos to making calls and using apps, your device depends heavily on network connectivity. However, when WiFi, Bluetooth, or cellular data stops working properly, it can quickly become frustrating.
One of the most effective troubleshooting methods is to reset network settings on iPhone. This simple yet powerful action can resolve a wide range of connectivity issues without affecting your personal data.
In this in-depth guide, you’ll learn exactly how to reset network settings on your iPhone, when to use it, what happens during the process, and how to avoid future network problems.
What Does Reset Network Settings Do on iPhone?
When you reset network settings, your iPhone clears all saved network-related configurations and restores them to factory defaults.
This includes:
- Saved WiFi networks and passwords
- Bluetooth pairings
- Cellular network settings
- VPN and APN configurations
- Network preferences
After the reset, your iPhone essentially starts fresh when connecting to networks.
Why You Might Need to Reset Network Settings
You should consider resetting network settings if you experience:
- WiFi not connecting or constantly dropping
- Slow or unstable internet speeds
- Cellular data not working
- “No Service” or weak signal issues
- Bluetooth devices failing to pair
- VPN connection errors
If basic fixes don’t work, this method is often the fastest way to resolve persistent issues.
Benefits of Resetting Network Settings
Resetting network settings can:
- Fix hidden software glitches
- Remove corrupted network profiles
- Restore proper connectivity
- Improve network stability
- Resolve multiple issues at once
Important Things to Know Before Resetting
Before you proceed, keep these key points in mind:
- All WiFi passwords will be erased
- Bluetooth devices will be disconnected
- VPN settings will be removed
- You will need to reconnect to networks
👉 Make sure you know your WiFi credentials before continuing.
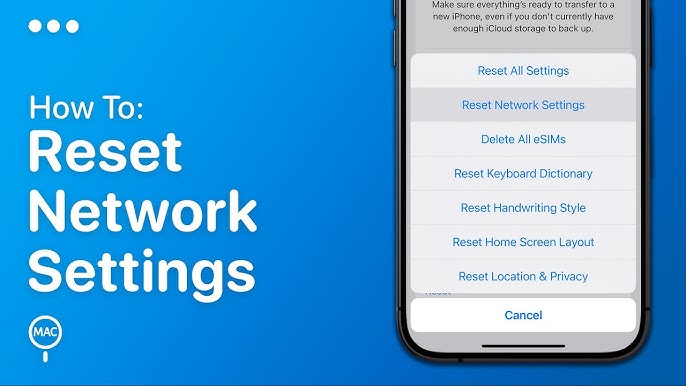
Step-by-Step: How to Reset Network Settings on iPhone
Follow these simple steps:
Method (iOS 15 and later)
- Open the Settings app
- Tap General
- Scroll down and select Transfer or Reset iPhone
- Tap Reset
- Choose Reset Network Settings
- Enter your passcode
- Confirm the reset
Your iPhone will restart automatically.
What Happens After Resetting Network Settings?
Once the process is complete:
- Your iPhone reboots
- Network settings are restored to default
- WiFi networks must be reconnected
- Bluetooth devices need re-pairing
Common Problems Fixed by Network Reset
1. WiFi Connection Issues
If your iPhone won’t connect to WiFi:
- Resetting removes corrupted network data
- Allows a fresh connection
2. Cellular Data Not Working
Resetting can fix:
- APN misconfigurations
- Carrier-related glitches
3. Bluetooth Problems
If devices won’t connect:
- Reset clears old pairing data
- Enables proper detection
4. VPN Conflicts
Resetting removes problematic VPN settings.
Alternative Fixes Before Resetting
Before performing a reset, try these quick fixes:
Restart Your iPhone
Often resolves minor glitches.
Toggle Airplane Mode
Turn it on for 10–15 seconds, then off.
Forget and Reconnect WiFi
- Go to WiFi settings
- Tap your network → Forget
- Reconnect
Update iOS
Ensure your iPhone is running the latest version.
Advanced Troubleshooting After Reset
If resetting network settings doesn’t solve the issue:
1. Reset All Settings
Resets system preferences without deleting data.
2. Check Router or Network
The problem might not be your iPhone.
3. Contact Your Carrier
For persistent cellular issues.
4. Factory Reset (Last Resort)
Erases all data and restores the device completely.
Tips to Maintain Strong Network Performance
To prevent future issues:
- Keep your iPhone updated
- Avoid unstable WiFi networks
- Restart your device regularly
- Keep Bluetooth connections minimal
- Use trusted VPN services
Real-Life Example
Imagine you’re at a café trying to connect to WiFi, but your iPhone keeps failing. You restart the device and toggle settings, but nothing works.
By resetting network settings, you clear corrupted configurations and successfully connect within minutes—saving time and frustration.
Frequently Asked Questions
Will resetting network settings delete my data?
No, your photos, apps, and personal data remain safe.
Do I need to back up my iPhone?
Not required, but recommended as a precaution.
How long does the reset take?
Usually less than a minute.
Does it fix slow internet?
Yes, if the issue is caused by incorrect settings.
Key Insight
Resetting network settings is like giving your iPhone a “clean slate” for connectivity. It removes accumulated errors and allows the device to rebuild connections efficiently.
When Not to Reset Network Settings
Avoid resetting if:
- The issue is clearly hardware-related
- Your router or network is malfunctioning
- You don’t have access to WiFi passwords
Conclusion
Knowing how to reset network settings on iPhone is a valuable skill that can save you time and frustration. Whether you’re dealing with WiFi issues, Bluetooth problems, or cellular data failures, this simple reset can often resolve the problem instantly.
While it does remove saved network configurations, the benefits far outweigh the inconvenience—especially when your connectivity is compromised.
By following this guide, you can confidently troubleshoot network issues and restore your iPhone’s performance in minutes.
In a world where connectivity is essential, mastering this simple fix ensures you stay connected, productive, and stress-free.